All I can say is that it is a good thing I do not have to rely on writing here to pay my bills. I would certainly be hurting if I did. In general, my computer and online activity have been minimal for a while, but that does not mean I have been busy doing nothing. I am getting stuff done but my method is erratic at best. As a matter-of-fact, I have come to believe I suffer from AADD, adult attention distracted dysfunction. This AADD causes me as an adult, to be systematically impaired in my ability to give full attention to the thing I am doing, because my attention shifts to any thought that comes to my mind, or anything that comes into my range of senses. This creates a cycle of physically shifting trajectory, fueled by my AADD. For example, I can sit at the computer with the intention to write. I will see an ad for a woodworking tool. This will remind me of something I need to do in the garage. I will go there and notice the workbench needs cleaning. When I start, I will notice a piece of wood. I pick it up and know immediately what to make with it. I will start to shape it and maybe knick my finger on a sawtooth. Because I bleed a lot, and freely, I know I have to go to the house for a band-aid because if I don’t, I will drip blood everywhere. After the band-aid, I will set at the computer to check my mail. Instead, I will notice a type of bird I don’t recognize at the feeder. I will look it up on the internet. I will see something that reminds me of a shot I took two years ago. I will start searching my files so I can work with it. Well, I could keep going on but I think the picture is clear.
So, sitting here at the computer, I’m going to see if I can get a handle on things again. After my family and friends, there are three things that I really like: photography, woodworking based projects, and writing. I am going to write about one of the woodworking projects I have completed recently. Yes, even with my AADD, I do manage to complete some things.
A few weeks ago I was browsing the internet and I saw some steampunk/industrial lights. I have seen this style before but it has never moved me one way or the other. But, when I saw these online I loved them. Our house is an A-frame and the lighting is subdued. I love it but Saskia is always complaining that it is too dark. So I said, how about I make one of these and she said, go for it.
I decided to make a two-bulb lamp using galvanized pipe and mount it to a wooden base. For the base, I planned to use a piece of hemlock. This I had leftover from some wood that one of Saskia’s coworkers had given me. When I got that wood I built a shelf for Saskia’s collection of fairy houses, but that’s a different story. The wood is old and reclaimed from an old farm shed that had been torn down. I decided I would make the lamp, paint the pipe black and stain the wood dark.


The first thing I did was to determine what electrical parts and pipe I would need. I went to the local stores and got what I needed. I was ready to start. As a side note, I am trying to use hand tools as much as possible for my projects. I think for this one, I did use an electric drill for the mounting holes and a jigsaw to round the corners of the wood plate.


With the parts in hand, I started to work on the wood. The piece was a nice uniform size and shape but the face and sides were very rough. You could see the ridges left by the saw blade from when it was milled. I decided to use a smoothing plane to get a nice finish. I was able to get a smooth finish with the plane and then sandpaper using a block of wood. I laid out the holes for the wiring and where to install the galvanized mounting plate. I drilled all my holes and then I stained the wood using an espresso color. I thought it would go well with the black pipe. With this done I turned my attention to the pipe.


I had decided that I wanted the lights to align with the bottom of the mounting plated so my fixture design was based on that fact, and where the wires entered at the center of the wood base. So I ended up with a galvanized mounting bracket to which I attached a two and one-one-half inch nipple fitting that was threaded at both ends. To this, I added a sixty-degree elbow coupling. I then placed another short nipple and tee-fitting. I added a six-inch pipe to each side of the tee. l then added a coupling that went from the pipe size opening to a larger size that would accept the lamp socket. To this, I would attach the lamp sockets. With the pipe done I put a couple of coats of black spray paint on it.


Next came the electrical wiring. Here is where I got stuck for a bit. I have built and repaired a few lamps before but they have all been single bulb fixtures. Since this has lamp sockets at each end and would be wired to a cord with a switch installed in the cord, I was in new territory. I thought I knew what would work but wanted to check it out online first as I did not want a fire. The online info completely confused me. It started talking about parallel lighting and other such stuff and it made no sense to me. I talked to several people in the lighting sections of local hardware stores and they were of no help. Finally, one day I was talking to my daughter Zoey and I mentioned my problem. I had forgotten that all of her formal education is in physics. She immediately explained to me how and why parallel wiring works. I said thanks, however, will this work and explained how I wanted to wire it. She said yep. My problem was resolved and it was a matter of connecting the wiring. I glued the light sockets, which were black rubber, to the ends of the pipes and ran my wires.


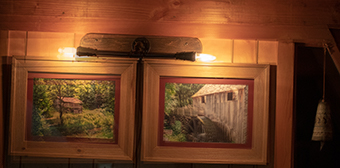
I installed the light on the wall and attached two vintage style bulbs. That evening I turned it on and asked Saskia what she thought. She said she liked it but it was too bright. Go figure.


